Why Moisture Testing Matters in Wood Construction
What if there was a crucial aspect of construction that you, as a general contractor or builder, were neglecting?
Don’t let it be moisture content.
The amount of moisture in your materials, particularly wood and concrete, could impact the outcome of your new construction project. If there is excess moisture, the structure of the building could be damaged or warped—or the moisture could lead to other problems that affect the safety of your clients and the reputation of your business.
Some crucial measures can prevent these issues. We’ll walk through them in the context of the construction industry:
- Why test for moisture content in wood construction
- Sources of moisture
- Types of damage
- How to prevent moisture problems
Let’s get into it.
Why test for moisture content in wood construction

Failing to test moisture content (MC) when building with wood materials can have serious consequences for the builder and the client. Consequences such as structural defects, health and safety breaches, and even litigations.
Wood shrinks and expands based on the moisture in its environment. Thus, if it wasn’t at an MC that matched its environment at the beginning of construction, it’ll go through that process during or after. As it dries, it may warp into a different shape than it needs to be.
This warping can affect other aspects of the building—the evenness of the floor, the ability for a door to close properly, or the strength of joints or fastenings.
But the effects of moisture are more serious when they become health and safety issues. The wood could begin to rot and weaken the structure.
Or mold growth could cause symptoms in building occupants.
If any of these situations occur, the blame could fall on the builder or general contractor. It could put you at risk of a lawsuit.
A quick caveat:
It’s true that some construction workers prefer to use wet wood for framing as it can be easier to work with. Others make sure the wood is at the right moisture content before starting. The key is that the construction materials must be dry before putting up drywall or OSB wall sheathing. Otherwise, mold or other issues could cause a lawsuit or customer complaints.
By taking steps to avoid the consequences of moisture from the start, you’ll have much less to worry about! Prevention starts with understanding where moisture comes from and how it can affect the jobsite. We’ll look at that next.
Sources of moisture in construction

Construction projects, particularly in the early stages, have many possible sources of moisture. We’ll look first at some sources of liquid moisture mentioned by the EPA in the booklet Moisture Control Guidance for Building Design, Construction and Maintenance.1
When a building doesn’t yet have a roof and hasn’t been sealed in with walls, all the materials are exposed to precipitation and humidity in the form of rain, snow, ice, and/or frost.
Then, there’s groundwater and surface runoff. If the land for a building hasn’t been graded properly or doesn’t have a good drainage system, water may run off and pool around the foundation.
And even if a drainage system is in place, heavy rains could overwhelm it.
Another less-obvious source of moisture is wet building materials. Concrete may have too much moisture, which then seeps into the wood around it or above it. Or the wood itself may not have reached the proper MC before delivery to the jobsite.
Aside from liquid water, climate can also affect construction materials. If the climate is very humid, the materials may remain at a higher moisture level—much higher than what the climate-controlled building will eventually be after construction is finished and an HVAC system is running.
So, what are the risks of such a high moisture content? Does it make a difference in the construction process?
Keep reading to find out.
Types of moisture damage in construction
Moisture can cause the following kinds of defects and damage in construction projects:
Warping of wood boards
The boards can twist, bow, or crook. Possible flooring failures include cupping and buckling.
End splits
If wood experiences sudden moisture loss, it’ll crack from the ends as it shrinks. This is called end splitting. Smaller cracks in the wood are known as checking.
Delamination
Delamination usually occurs in engineered wood flooring. Moisture causes the surface or veneer of the wood to detach from the rest of the board.
Decay or rot
When wood has a moisture content higher than 20%, it’s at risk of decay—a process of the wood breaking down.
Fungi, which grow in wet environments, can also destroy wood.
Mold and mildew
Unlike decay, mold and mildew don’t break down the wood. But they do discolor and stain it. Mold grows in a moist, warm environment and spreads by producing spores, which can be harmful to health.
According to the Center for Disease Control and Prevention, it can cause symptoms like “stuffy nose, wheezing, and red or itchy eyes, or skin.” Some people also have stronger allergic reactions, such as asthma, a fever, or difficulty breathing.
So, here are some steps you can take to prevent mold and all the other moisture issues mentioned above.
How to prevent moisture problems in your wood construction projects
To prevent moisture problems in your wood construction projects, check that your wood materials are at the ideal moisture level for your region. This number is called the EMC, or equilibrium moisture content.
EMC is based on two factors: (1) relative humidity and (2) temperature. This means that the number will vary by region.
The easiest way to figure out the EMC for your area is to use an EMC chart. The USDA Forest Service provides an EMC chart covering many major cities in the United States. Find the one closest to you with a similar climate.
Then, you’ll want to determine whether your wood materials are close to that number.
Here’s how:
Minimize moisture from the source
When starting a construction project, minimize any moisture from sources you can control and have a plan for dealing with what you can’t control.
The Moisture Control Guidance for Building Design, Construction and Maintenance booklet gives the following advice for preparing the site:
“The first step in water control is to locate the building in dry or well-drained soil and use or change the landscape to divert water away from the structure. In other words, drain the site. This includes sloping the grade away from the building to divert surface water and keep subsurface water away from the foundation below grade. After the site is prepared to effectively drain water away from the building, the building needs a storm water runoff system to divert rain from the roof into the site drainage system.”2
By having an effective drainage system, you can keep ground water from pooling around the building and seeping into the wood.
The booklet also advises having good “moisture control policies” that are enforced by the contractor.3
These policies should include steps to:4
- Minimize stormwater runoff
- Drain water
- Keep materials from getting wet (as much as possible)
- Dry materials
Protect the wood
The less wood materials are exposed to the elements, the better. This applies both in transit and on the construction site.
Ideally, the materials shouldn’t sit for long at the jobsite before work begins.
But if you can’t avoid it, cover them with tarps or other temporary enclosures and ensure the storage areas have good drainage.
As noted before, some construction workers prefer to use wet wood for framing. What’s most important is that the wood has reached the proper moisture content before enclosing of the building.
Test for moisture

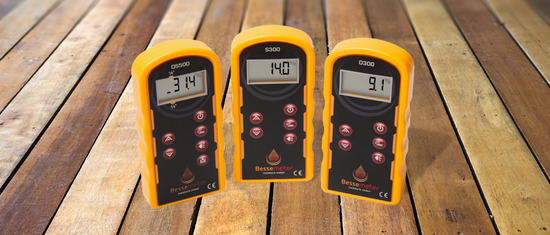
Use a wood moisture meter to test the moisture content of your wood materials and check that they match the EMC. Even if you’re buying wood that has supposedly been kiln dried to a certain moisture content, it’s still wise to verify. Check it:
- At the time of purchase
- On arrival at the jobsite
- Before you begin using the materials
Also, test your concrete slab. Per the ASTM F2170 guidelines, relative humidity testing, which involves placing in situ probes into holes in the concrete, is one of the most accurate moisture testing methods for concrete.
These test results will give a more accurate overall picture of the slab’s moisture conditions than the traditional calcium chloride test (or MVER test).
Why is concrete moisture testing so important?
See, you could have perfectly dry wood. But if the concrete you place it on top (as in the case of a concrete subfloor with a wood floor covering) is still losing moisture, it could move into those wood materials. Then you’ll have to dry your wood all over again. So don’t hesitate to use that in-situ RH test.
Once you have your moisture measurements for your wood and concrete materials, use them to determine your next steps—whether you can proceed or whether you need to dry them more.
Give time for drying and acclimation
If your concrete or wood is still wet, don’t begin building. Even if it requires more time, it’s better to wait until the concrete has reached the proper relative humidity levels, and the wood has reached its proper moisture content.
The extra time for the drying process will save you from dealing with damage later on.
In some cases, the building materials may not need to dry much. Just give them time to acclimate—or adjust—to the jobsite’s environment. See our article on wood acclimation for more details on why this process matters.
Control the environment
And finally, once you have a suitable environment for your wood materials it’s important to keep it consistent and stable.
As soon as possible, get the building enclosed and the HVAC system up and running. This will prevent major fluctuations in humidity levels and temperature.
Check for moisture. Protect your work.
Convinced that you need to check the moisture content of your materials and protect them from external moisture sources? Taking this extra step will be just one more way to ensure success in your building contracts.
And every successful building contract means safety for your clients and a better name for your business.
It all starts with simple moisture control and testing.
To determine the ideal moisture content for your wood, check out our article about equilibrium moisture content.
- Moisture Control Guidance for Building Design, Construction and Maintenance, December 2013. (↑)
- Ibid., p. 9. (↑)
- Ibid., p. 67. (↑)
- Ibid., p. 30. (↑)
